2018-06-23

Beginners tools: Choosing chisels

Chisels are essential in your shop.  With some experience you will be amazed at what you can do with them.

This blog is to help you with your choice.  We will discuss prices, sharpening, edge retention and technique.

I own many sets with large price differences and I will be talking about those trying to describe them with their plus and minus.  Let's start by the least expensive set.

Marples set of three:

Marples chisels are fairly inexpensives

Beginners tools: Sharpening stones

The very first skill required to enjoy manual woodworking is to be able to sharpen properly a blade or a chisel.  You may buy a high end plane but, if you are not good at sharpening, you will not be happy with it.  I have a Blog describing my method and also a french video.

This blog will discuss the types of stones that I've used.  There are many other media available that will not be discussed here because I don't know them.

With experience, I can say that all media can achieve a decent edge.  The problem is with the woodworker skill/knowledge/practice.

Water stones.

1000/8000 water stones


Beginners tools: Planes

This is a subject that has been discussed many times on this blog.
Many people are asking me the same questions.  They ask if they should buy a new or an old plane, what size it should be or if they are better with a bevel-up of a bevel-down one.

Veritas low angle jack, Lie-Nielsen 4-½, Record 5

Beginners Tools: Choosing a saw

This blog is to help you for choosing a saw and I will look at what you should know before buying one.  The main decisions for you will be: do you want to learn sharpening or not and what your budget is.  Saw prices are very wide, probably more than any other tool.

Sawing straight is one of the more important skill in your workshop.  When your cut is not straight you will need a lot more planing and you may have to scrap a piece once in a while.

You do have a few choices, let's explore them.
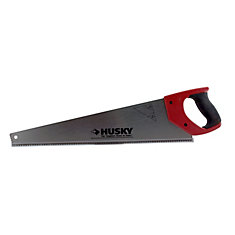
  • Big box hardware store saw
Those saws are inexpensive and have their teeth tempered.  You can not sharpen them, you use them until they don't work any more and throw them away.
SCIE À DENTURE GROSSIÈRE 20 PO

Beginners Tools: General Review

This blog is the first dedicated to beginners.  It will give you a general idea about the tools required to do manual woodworking.  More detailed blogs regarding beginners tools are available here:
The first and more important aspect to master is sharpening.  If you do not master this then, no matter what plane, chisel or saw you buy, you will not get anywhere.

I've talked about that subject here and I also have a french video (just look, you don't need to speak french).

For saw sharpening it's here.

Planes:

Low angle jack, standard 45° bedded jack, standard smoother no. 4

Beginners tools: Marking and Measuring

Marking and measuring are two very important aspects in woodworking and you should be looking for very good quality tools.  Not so long ago, two of my squares have been verified and scrapped because they were not perfectly square.

There is so many types of rulers, squares, marking gauges, knifes, etc that the choice is not so easy.
Let's see the tools that I own and how I use them.

Squares:

Protractor square, machinist square and standard square

Technique: Tear-out control with hand planes

We all have to plane different types of wood and some of them could be highly figured and cause tear-out.

Here are some known methods that are effective at reducing those tear-out.

For a standard plane with a 45 degree bed:
1. A sharp iron
2. A reduced mouth opening
3. Moving the chipbreaker closer to the cutting edge
4. Adding a 5 or 10 degree back-bevel
5. Reducing the depth of cut
6. Increasing the chipbreaker angle

In details now.

Technique: The cap iron effect

With this blog I want to explain what is the capiron effect or chipbreaker effect, what kind of surface finish you can get and how to set-up your plane properly.  It follow a previous blog about tear-out control.

Here is an exemple of "against the grain" planing and the kind of shavings you will get.

This is planing against the grain with the capiron effect

Technique: Crosscut saw without set.

I've been given a crosscut saw and, as usual, it was in bad shape.  The teeth was on an arc, the plate wasn't straight and the handle was grey.  After quite a bit of work sharpening, I ended up with a saw where all set was gone (or close).

Before setting the teeth I went for a test cut and got surprisingly good results.

Before setting the teeth I went for a test cut and got surprisingly good results.

2018-05-15

Technique: Dado joinery

A very useful joint, a dado can be through or stopped.  It's a joinery very useful for shelves or dividers (between drawers).

Many procedures can be used to achieve a dado with manual tools.  With this article we'll be looking at through dados and using two methods.

First method: This is the basic one that requires minimal tooling.  Here are the two boards that will be joined together using a chisel, hammer, square, marking gauge and a knife.

First method: This is the basic one that requires minimal tooling. Here are the two boards that will be joined together using a chisel, hammer, square, marking gauge and a knife.

Restoration: Stanley 70, box scraper

The excellent website of Supertool describe the Stanley 70 like this:
«This is a tool used to scrape the markings from the wooden shipping boxes, which were the most common way of packing goods prior to the invention of corrugated folding cardboard boxes, styrofoam peanuts, bubble pack, and all sorts of modern wonderful shipping products. The owner or user of this tool could scrape the previous shipper's markings off and use the box over»

Supertool describe this Stanley 70 as a scraper.  Well...I have to disagree.  More on this later on.

Supertool describe this Stanley 70 as a scraper. Well...I have to disagree. More on this later on.

A closer view of the plane (or scraper).  You can easily see the mouth and the blade bed angle and this helps a lot to know if it's a plane or a scraper.  For me, it's clear that it's a plane.

A closer view of the plane (or scraper). You can easily see the mouth and this helps a lot to know if it's a plane or a scraper. For me, it's clear that it's a plane.

The blade is seated at around 45° which is not possible for a scraper.

The blade is seated at around 45° which is not possible for a scraper.

The tune-up of this tool begins with sanding the sole on 120 grit sandpaper.

The tune-up of this tool begins with sanding the sole on 120 grit sandpaper.

The sole has quite a convex shape.

The sole has quite a convex shape.

Sole flattened.

Sole flattened.

The blade now.  There is no rust and I begin with the back.  I want to know if it's flat... it isn't.

The blade now. There is no rust and I begin with the back. I want to know if it's flat... it isn't.

The solution to this problem is to use the "ruler trick".

The solution to this problem is to use the "ruler trick".

This blade is really convex.

This blade is really convex.

After quite of some time, I can see that I'm going to have to spend a lot more.

After quite of some time, I can see that I'm going to have to spend a lot more.

Here is my solution, a hammer.  I've done that many times in the past but once I cracked a blade.

Here is my solution. I've done that many times in the past but once I cracked a blade.

Ah!  In no time I have nice clean steel all the way across the edge.

Ah! In no time I have nice clean steel all the way across the edge.

Regular sharpening starting with a coarse oil stone.  For a small blade I help myself with the Veritas holder (It comes with their grinding jig).

Regular sharpening starting with a coarse oil stone. For a small blade I help myself with the Veritas holder (It comes with a grinding jig).

Fine India stone.

Fine India stone.

Removing the burr with a translucent Arkansas.  Notice here that the ruler used is much thicker than the one used previously.  With this higher angle I'm sure that I'm honing the very edge.

Removing the burr with a translucent Arkansas. Notice here that the ruler used is much thicker than the one used previously. With this higher angle I'm sure that I'm honing the very edge.

Leather with green Veritas compound on both sides of the blade.

Leather with green Veritas compound on both sides.

I go for a test cut and...it doesn't work!  The mouth is not straight and this part of the sole is where the blade seats.

I go for a test cut and...it doesn't work! The mouth is not straight and this part of the sole is where the blade seats.

This need to be filed straight and it's not easy because I can't find a method for holding this tool in a vise.  I end up holding it with my hands.

This need to be filed straight and it's not easy because I can't find a method for holding this tool in a vise. I end up holding it with my hands.

Getting ready for another test cut.

Getting ready for another test cut.

I want to do like a real journeyman who wants to reuse a box.

I want to do like a real journeyman who wants to reuse a box.

Humm... It does work but not like I was expecting.

Humm... It does work but not like I was expecting.

The bevel side of the blade is facing the handle.  It was like that when I got it and the idea that it could be a scraper got me a bit confused.  I rotate the blade and, all of the sudden, everything is working great.

The bevel side of the blade is facing the handle. It was like that when I got it and the idea that it could be a scraper got me a bit confused. I rotate the blade and, all of the sudden, everything is working great.

I really enjoy getting those old tools back to working condition.  All this took two hours but for me it was fun.

Normand

Technique: Tenon and Mortise

Tenons and mortises is a type of joinery used since centuries.  You need to master this technique because you will need this type of joint for many of your projects.

Here is my method.  I will use Douglas fir boards that have been planed and are squares.

I will use Douglas fir boards that have been planed and are squares.

Tool restoration: Disston back saw

Today I'm restoring a Disston back saw.  It's not an old model but the method is the same.  I should be able to do a good user's saw with it.  We will look at sharpening, rust/paint on the saw blade and how to restore the handle.

This saw has a 17" long plate and 10 TPI.  I will sharpen it as a crosscut saw.

The initial condition is typical.  The teeth are not straight, they form an arc.  I will need to joint them.  The saw plate is straight and there is hardly any rust.  The handle is in good condition but has lots of sharp edges and is not comfortable in my hand.

Condition initiale / Initial condition

Tool review: Stanley 12 scraper

I bought a lot of old tools a while back and now have two Stanley 12 which were part of that lot.  I wasn't a very interested with that tools but, after sharpening properly the blade, the results are great.  If I need to scrape this is now my favorite tool.

Stanley 12

My drilling tools

Manual woodworking requires a surprising number of drilling tools.  I don't know of a single drill that can do it all.  Quite a bit of money will need to be invested to get a full range drilling capacity.
When it comes to drilling, the first tool required is a brace with bits.

Two regular braces